
Introduction
Here is the Crescendo Music Education Podcast – Episode 47.
Hello, everyone. Welcome to another edition of the Crescendo Music Education Podcast. I’m going to talk today about using felt staves and counters in your classroom, I am a little bit of a fan of manipulatives. You’ve probably guessed that, I love hands on engagement, different ways to practice known concepts. I guess that’s my thing. So I thought I’m just gonna pick one every now and then and do an episode on my favourite manipulatives. So this one is all about felt staves and counters.
About ‘Read the Episode’: Sometimes, we would rather skim visually than listen to a podcast! That’s a great way to learn too! The transcript of episode 047 of The Crescendo Music Education Podcast is below.
Introduction
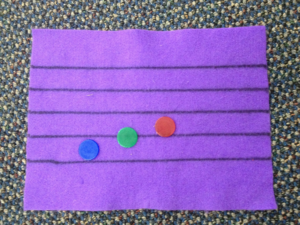
So I’m going to narrow it down to just five ideas, five of the main ways I guess I use my felt staves and counters. I think the first thing I have to do is tell you what I mean by a felt stave or staff, however you refer to it. So I have a class set plus a few extras, 30-35 pieces of felt, they are about an A4 size for the Australians (Americans letter size) and I use them landscape.
So each staff has the five lines drawn across the whole length of the felt to show the staff. Now I used to use laminated paper, and I’d put the counters on but they slipped, the children would do their work, their dictation, their whatever they were doing, and then you bump the paper and the counters slide and their work is wrecked.
So I have just found that the felt works quite a bit better. So when you are creating your felt staves just a word of advice is you buy your counters first, there is nothing worse than ruling up 30 pieces of felt with five lines on each. And it’s a bit of a drag because the felt pens (your Nicos, don’t like Sharpies) whatever you’re using, don’t like really drawing on felt. So it takes a while and to do it neatly. And you rule it up, you buy your counters and you go on my counter is bigger than the space, because remember that your note heads when you are writing music, your note heads just touch the lines either side, or if the note head is on the line, the line goes right through the middle.
That reminds me, I’ll put in the show notes, check out my teaching tip Tuesday from some time ago, where I get the children to practice notes on a line and in a space and we do on the line and put our arms and our hands in the middle of our face. Because the line goes right through the note head, see, get it head, okay, so there’s on a line and in a space, we put our arms and our hands, either side of our head, touching the top and touching our chin, so that the note sits in a space, on a line, in a space.


And I am showing you so if you get to see this video, you’ll see space, line, space. I use that activity quite a bit, I’ll put a note on the board on the staff. And the kids have to show me with their body is that note on a line or in a space. Because when you think about it on a line, if a bird sits on a line, it’s actually sitting on top of the line, isn’t it, the lines not going right through the middle of it.
So even just the concept of a note being on a line and in a space needs to be taught. And I really think that that’s the essential part of being an effective educator, certainly an effective music educator is to make sure all of these little steps are taught but in a fun way.
#1: Line & Spaces Game
Alright, so let’s go back to what I was saying, which was, we first buy the counters, you work out the distance it has to be between the lines on your staff, and then away you go rule up your 30 pieces of felt. So you’ve got your felt, you’ve got your counters, let’s look at how we can use them.
One of the first ways I use them is something I just called the lines and spaces game. So we’ve just learned what a staff is. So for me, that’s year one, and it’s where notes live, we do not yet have conscious pitch elements. This is part of in fact, the preparation for my first pitch elements is they need to understand the staff, so I need them to know that the first line is on the bottom. So again that is another thing that must be taught, that’s actually not that logical.
So you can talk about a building, I like saying a building like the first floor, second floor. We start counting from the bottom, I have a couple of little funny things I do about starting at the bottom. And I might just happen to tap my bottom when I say that. So we have a lines and spaces game.
Now for this one, I just give everyone one counter and one felt staff, they put it on the ground in front of me, and they’re all facing the wall. They’re all facing the front. I think that’s important to not be in a circle, because I don’t want them to be seeing the correct answer, but upside down, which makes it look incorrect. So I like to have them all facing the same way. And I will call out something like second space, they have to put their note head on the second space and then put their hands on their head. And of course, they all want to do it very quickly. So soon it becomes a race.
And I sit back and point Yeah, okay, first, second, third, fourth, then I’ve sort of lost track. I’ll just check that they’re correct. And then Oh, you did you, got that one first. Yay. We’ll all clap, away we go. So they have lots of fun doing that. And we’re just practicing the naming the notes and spaces first, second, third, fourth, fifth space. And first, second, third, fourth, no, did I just do that the wrong way round? Yes. First, second, third, fourth, fifth line, and first, second, third, fourth space.
So it’s a really simple game, but they they love it. And before that, I’ve done a bit of exploring and given them more counters and said, Can you put all your counters in spaces, put all your counters on lines, pick out all of the pink counters you’ve got and put them in spaces, you just make up whatever games you like. So it’s just playing around with the staff.
#2: Dictation Using Felt Staves and Manipulatives
The second thing I like to use my felt stave manipulatives for is dictation. So one example, a very simple one, I might just sing a ‘so’ and ‘mi’ melody, once they know so and mi, and they know that so and mi is a skip apart, that me is a copycat that so and mi are both on lines, mi is a skip lower, all of those things they have to know, you might sing a simple melody. And they put the note heads on to the staff just as simple as “doo, doo, doo doo” (s m s m – sung). And they have to put the note heads in.
This is so important, because they’re learning that they can’t put the note heads on top of each other, they have to keep moving from left to right, that left to right progression is so important and how much easier to just slide some counters around, then have to write pencil on paper and then rub it out. And they can easily see correct examples all around them.
So I just think this is so powerful, to do some simple dictations right from when they’ve got some melodic elements. Use these felt staves and I can tell you that all my primary kids right up to 11-12 year olds, love using them. I don’t think they ever outgrow them.

Now, just a little note, because I’ve come across this when I’ve done methodology lecturing before, some people like to have so and mi just on the first and the second line and just in the third, Hold on, Yeah, the third and the second space. In other words, like the treble staff, G and D, and C and A.
Now, my argument is that you can actually do so and me in any place on that staff. Because there is no clef, we do not yet know what a clef is and how it is used. There is no clef there to dictate the absolute pitch. So at this stage, we’re just using relative pitch, so you can put so anywhere and work out where me would be and do your dictation.
Now, if that really goes against the grain, and you think, I could not possibly put so on the third line and me on the second line. I could not possibly because that is B and G and you can’t accept that. There’s no treble clef so it’s actually not B and G. But that’s okay then, don’t do it. I’m not making you, just giving you my perspective on the fact that there’s no clef.
So you put it wherever you want, okay, but stick to just those places that works on the treble staff if you’re happier, okay. So dictation any of the known notes that they know pictures or absolute names, if you work in letter names, go for it. It’s a really handy little dictation tool.
#3: Note Positions Using Felt Staves
Three. The other thing I like to use my felt staves for is just generally what I’d call note positions. So I might say, okay, my do today is on the second line, can you please put a counter where me is, or so today is on the fifth line, put the counter where do would be. So you can play those sorts of games. Or you could say, put the notes of the pentatonic scale starting in the first space, so just get them to work out, I guess, relative pitch.
And as you have no doubt worked out, I do work with solfa but I also work with absolute names, and it can work either way. And a little thing I was going to say a bit later. If you want to work with a clef, here’s a little tip you could do. It’s lots of fun kids like it, but takes a bit of time though, you can give them a length of black wool, and they can actually create a treble clef at the beginning of their felt staff, looks pretty amazing.
So if you really want to work with a particular clef, they can actually make it with a piece of wool. I know this sounds all very complex, but it’s actually not. And if they know your routines, and they know where your gear is kept, it’s not complex at all. It’s just fun. And it takes less time than getting out pencils and papers, I reckon. So that’s note positions.
#4: Known Songs
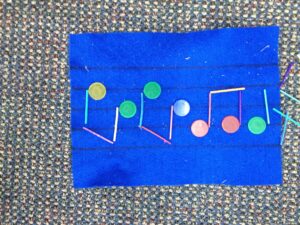
The fourth one is just putting on known songs, you can just literally do pitch put on the note heads showing the pitch of this song. So whatever song you’re working on with whatever known notes, you know, go for it. So that works really well. You can add rhythms by adding matchsticks. I like it, the size that I’ve got, which, as I’ve said about an A4 and the counters, you’re gonna ask me that size of counters, aren’t you?
I will put some details and pictures in the show notes for you. Okay? So if you’re listening to this on Spotify, or somewhere else, pop back to my website to this episode, and have a look at some of the pictures. I’ll put a whole lot of pictures in there for you. So if you use matchsticks, they’re just exactly the right size for the note heads.
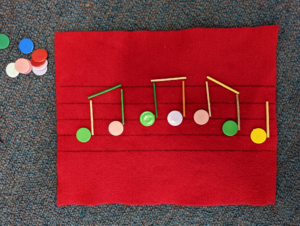
They look so amazing, and I love this is such good reinforcement for stem direction. So up at the back, like the tail of a cat down in the front, like an elephant’s trunk and you must have the stem cross the magic middle line. It is so quick and easy to see which students haven’t got that and it’s so quick and easy to help them correct that misunderstanding.
So as formative assessment, sticking some matchstick stems on your counter noteheads on your felt staves is really effective. I also have a little container where I have some half matchsticks that I use for Ti Tika and Tika Ti. So cool.
If you want to do something with compound metre more difficult because you need your dotted crotchet, your tum. I have used little dots that are like the cutouts from a hole punch. I hope you know what I mean, but we don’t get hole punches as much anymore. We used to have to punch sheets to put them in ring binders. And you can use those little hole punch cutouts as the dots if you want to use dotted crotchets and do some compound metre rhythms. So you can just do noteheads just for pitch. But you can add rhythm with the matchsticks it’s pretty cool. So I hope you check out those pictures in the show notes.
#5: Create!
And then of course number five, I had to put in create, again, you use whatever known elements that you’re working on. I’ll give you one example that I really do like to do. I like using G, A and B because when I start recorder I do G and E on recorder because I want to get both hands working.
But after I’ve done G and D I add A and B so that we’ve got our Do Re Mi, G A B on the recorder and we write ourself a recorder piece, you can put in your treble clef with wool if you wish, or you can just say as I have done on some occasions, okay, most occasions, I have just done pretend there’s a treble clef alright where would G be? So away we go. We write ourselves a composition on three notes, you can add the rhythm if you like. And they have done a composition that they can then play on the recorder.
So they can write it, they can practice it, they can go and play their friends, you can take photos of it, put it up on the screen, and we can play each other’s composition. It’s heaps of fun. I really like that. So that’s five quick ideas for using my felt staves and counters, lines and spaces games, dictation, note positions, writing known songs and creating melodies.
BONUS: Storage for Felt Staves & Counters
The only other thing that I wanted to mention is storage. I have tried all sorts of things for the counters particularly, the felt stave not so difficult. I’ve got tubs that slide in like drawers. Now they are amazing. I’ll try and put a picture of one of those units for you too.
They are really handy. So they just sit flat, my felt staves but the counters. I used to have them in the little film canisters. In the old days of film before we could take 1000 digital pictures, which I love, anyway, I used to have them in that. But even then the lids, it sort of worked. But the lids would come off. There’d be counters all over the bottom of the bucket or whatever you’re storing it on. Someone would only have, I’ve only got four counters in mine because someone’s, it was just a nightmare. This is what I do now.
Oh, and I do know Deb Bryden has hers stored in I want to say m&m tubes. I hope that’s right. And she’s made beautiful counters, and they’re lovely. They’re really gorgeous. So you do whatever works for you. But I’ll tell you what works for me. I have mine in one of these storage tubs just dumped in. I put them on the ground andI take the tub out. Then, I put the tub of felt staves on the ground, the kids walk past. And they take a handful of counters, a small handful of counters, they take a felt staff, they sit down and they start working on it. It is quick, it is efficient. Because I’ve set up those expectations. They know what a small handful is. I mean, everything has to be taught doesn’t it? Again, it’s just the nature of teaching.
So that’s not a problem for me, when we pack up, it all just gets tipped back in this tub. It’s actually very quick. So that’s what I do. Basically, it’s a tub of counters, and a tub of the felt staves that are kept nice and flat. And that’s how I store it.
So I hope you’ve got a couple of little ideas, maybe new ideas, or maybe a reminder of something you haven’t done for a while. I love using my manipulatives, I love using my felt staves and my counters. And why not consider doing that a little more. We’re still doing writing. We’re still doing reading. And we’re just not using pencil on paper, but we’re working on our literacy. So I guess we’re not really doing writing are we, no. But we’re working on our literacy skills, getting ready for writing.
Anyway, I hope you have got something out of that. Let me know if you’ve got some good ideas out of this episode. Till next time. Bye.
Sign Off
This podcast is brought to you by Crescendo Music Education, connecting, supporting, and inspiring music educators. You’ll find links to Crescendo’s social media platforms in the show notes. Please connect with me and be part of the Crescendo community. You might consider becoming a Crescendo member. You can access hundreds of files, worksheets, printables workbooks, repeat workshops, and webinars for a low annual fee and receive great discounts on events. So come and connect with me, Debbie O’Shea. See you in the socials.
Just for Laughs
As we know, laughter relieves stress. Don’t lose sight of the funny side of life.
I have tried to eat a clock before but I found it was too time-consuming.
Where to find me:
- Crescendo Community Facebook Group: https://www.facebook.com/groups/crescendocommunity
- Official Crescendo Page: https://www.facebook.com/CrescendoMusicEd/
- YouTube: https://www.youtube.com/user/CrescendoMusicEd
- Twitter: https://twitter.com/crescendomusic
- LinkedIn: https://www.linkedin.com/in/debbie-o-shea-62a3741b/
- Instagram: https://www.instagram.com/CrescendoDebbie/
- Pinterest: https://www.pinterest.com.au/crescendodebbie/
Subscribe To Our Blog
For the latest tips and tricks from Crescendo Music Education, fill out your details below and hit Subscribe... you will happy you did!
")
Choral Series: Creating Literacy in the Music Room (Part 2)(CMEP098: Read the Episode)

Choral Series: Making Positive Change in the Lives of Children (CMEP095: Read the Episode)
